
Putting Your Course Online in a Hurry
by CFT assistant director, Stacey M. Johnson
Faculty, are you thinking about how to put some of your course content online in a hurry? Perhaps to deal with unexpected events? At Vanderbilt most of our courses meet face-to-face, however, if you find that you need to make adjustments in a hurry to best serve students who cannot make it to campus, we have resources to help.
This blog post is Part I in a series of blog posts about how to move your course online in a hurry. For Part II about assessing student learning in an online environment, click here.
Online teaching at its best is an iterative design process that relies on academic research, standards developed by professional organizations, and input from stakeholders. However, if you find yourself needing to put some of your course content online because you or your students can’t make it to a face-to-face class right now, that can be done in a relative hurry using the tools already available to all faculty through Brightspace, our course management system. For a preview of some of the useful tools in Brightspace, check out this video or visit our on-demand resources page.
For faculty trying to move course content online, it can be challenging to translate what they already do well in a face-to-face classroom into an online module. The most important thing to consider is how to clearly communicate with students about expectations and course requirements. Consider using the Brightspace Announcements tool for whole-class communications, and, to provide a predictable structure for students, here are some models you might want to follow as you’re getting started moving some or all of your course online.
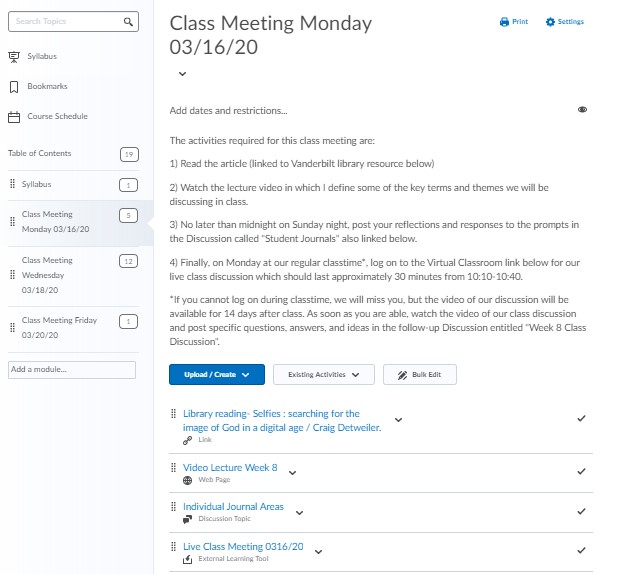
For Seminars / Discussion-Based Courses → Read. Journal. Live Discussion.
In a small seminar, students will probably read one or more resources before class, think through how the materials relate to themselves, to the major themes of the course, and to other course materials. Then, students come to class prepared to make sense of what they have read with the group. There may be a bit of lecture from the professor and a lot of discussion among the seminar participants.
How would this class format work online? Consider this possible model as a place to start:
Read. Journal. Live Discussion.
- Create a module in the Content area of your Brightspace course to contain all the materials and activities for that class meeting. Make sure to name the module in a way that its contents are easily recognizable to students. Add a description to the module by hovering your mouse over the words “Add a description”. That space will open up into a text box. Outline clearly for students the specific steps they will need to complete the activities in the class meeting. What will the need to watch? Read? Complete? Submit? Discuss? Etc.
- Add any required readings or other materials to your course. You can upload a document or other file by clicking Upload/Create then Upload Files. You can link to library resources or online materials like websites by clicking Upload/Create then Create a Link. You can also create a quick webcam video recording giving students some of the supplemental information that would normally come out in class. For webcam videos of less than three minutes, click on the Insert Stuff button, then choose Video Note. For webcam recordings of longer than three minutes, use the Kaltura Capture tool. Then, add the video to your module.
- Create space for thinking and reflection with a private discussion group for each student or create an assignment where students can submit their answers to prompts about the reading and video before they come to the live class for the discussion. These private submissions can be submitted for a grade in the gradebook, or the instructor can just scan them before class to make sure students are all on the right track.
- Finally, activate and set up the Virtual Classroom meeting for the day and time your class normally meets. This will provide your students a link to enter the Virtual Classroom space for your video conference. We strongly recommend printing off our handy quick start guide on hosting a Virtual Classroom meeting and keeping it next to you as you host the meeting in case any questions come up.
In the end, your Brightspace module might look something like this:
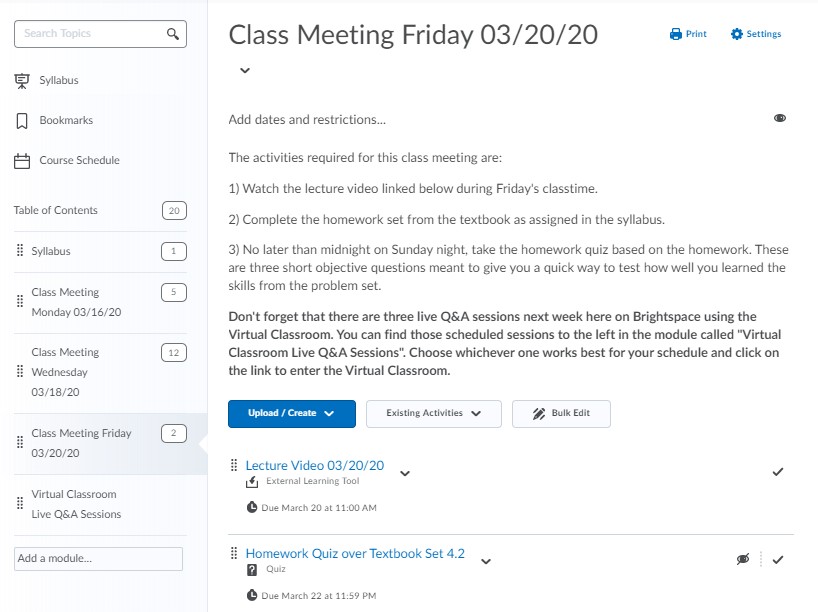
For Lectures / Larger Courses → Lecture Video. Homework Quiz. Live Q&A Sessions.
In a lecture-based class, the instructor will typically prepare lecture slides and a handful of check-in activities with students to ensure that everyone is making sense of the content. After class, students may have practice sets or other homework to complete. Students in larger classes may also have the opportunity to attend office hours with a TA to ask questions and go over challenging material.
How would this class format work online? Consider this possible model as a place to start:
Lecture Video. Homework Quiz. Live Q&A Sessions.
- Create a module in the Content area of your Brightspace course to contain all the materials and activities for that class meeting. Make sure to name the module in a way that its contents are easily recognizable to students. Add a description to the module by hovering your mouse over the words “Add a description”. That space will open up into a text box. Outline clearly for students the specific steps they will need to complete the activities in the class meeting. What will the need to watch? Read? Complete? Submit? Discuss? Etc.
- Build your video lectures using the Kaltura Capture tool to create a video in which you talk over your lecture slides. A couple of important tips for making educational videos:
- In general, breaking up a longer lecture into several videos of no more than 10 minutes long is a good idea. It is both easier for you to produce as the instructor, and easier for your students to watch. Longer videos with no breaks between are just not as effective.
- Consider adding captions to your video to make it even more accessible to students. Captions can be edited as well.
- For a more detailed treatment of the research on effective educational videos, check out this CFT teaching guide on the topic.
To add your finished video lecture to the module, follow the steps in this guide.
3. Create quizzes as check-ins. If there are typically independent homework assignments after the lecture, giving students a way to check in and make sure that they are progressing on the homework can be useful. Create a short, low-stakes quiz after each homework assignment and then add a combination of True/False, multiple choice, and other objective questions to ensure that your students are getting what they need from the homework assignment. For this type of quiz, err on the side of shorter and lower stakes. This is not a test of student knowledge, just a check-in to let the instructor and student see progress.
4. Finally, activate and set up the Virtual Classroom meeting for regular office hours or Q&A sessions where students can talk one-on-one or in small groups with a TA or the professor. Creating one separate module just for Virtual Classroom meetings might help your students locate them more easily. After you create the Virtual Classroom module, click the “Existing Activities” button, then “Virtual Classroom”, then click on the meeting you want to link to. That will create a link in your course that will take students directly to the meeting room. Create such a link for each one of the Virtual Classroom meetings you will hold. We strongly recommend printing off our handy quick start guide on hosting a Virtual Classroom meeting and keeping it next to you as you host the meeting in case any questions come up.
In the end, your Brightspace module might look something like this:
For Other Kinds of Courses
If neither of these two formats will work for you, here are a few other ways you might be able to move some of your course content online:
- Expand your use of online textbook resources or other platforms you already use: Many courses, particularly intro courses and surveys, require a textbook from a publisher that has developed its own online platform. It is possible that you are already using some online resources that come with the textbook. If your students are already familiar with the platform and the resources are there, consider expanding your use of these resources. Contact your textbook rep to see what may be possible and to ask if their online platform integrates with Brightspace. Other faculty on campus are using social reading tools like Perusall or eComma, both of which are already integrated with Brightspace.
- Use the Discussion Tool as a Text or Video Discussion Board: Some courses just need more extended time for discussion. Consider using a discussion board to get students communicating asynchronously. You can set up a discussion board to be a large group discussion, you can put students in smaller discussion groups for a more manageable experience, or you can even give students an individual space for journaling or one-on-one communication with the instructor. One of the coolest features of the Discussion tool is how instructors and students can use text, audio, video, images, and web links in their posts. For a video discussion board, participants click to post, then instead of typing text into the text box, they use the Insert Stuff button to record and add a Video Note to the Discussion text box. The result is a nice change from a text-heavy online course but doesn’t require students to all meet at the same time like a Virtual Classroom meeting.
- TopHat Polling and Online Modules: Vanderbilt has a campus-wide license for TopHat, an interactive polling system that also supports some kinds of online teaching. If you are already using TopHat in some ways, expanding and reimagining how you are using this tool might help you move more of your instruction online. Check out these TopHat Vanderbilt support resources.
- Upgrade your videos: Check out the CFT guide on Effective Educational Videos to make sure you are designing your videos with best practices in mind. If you need to create more substantial videos than what is possible using Kaltura Capture, check out the CFT’s One Button Studio. The digital media team can help you create truly professional quality videos for your classes.
- For labs, studios, and performance-based courses, your hands-on approach to your discipline will undoubtedly require a unique mix of tools. It might be useful to think about what parts of your typical classroom experience are essential in the event you need to move your teaching online. For example, although hands-on work is far preferable, can hands-on work be replaced with carefully filmed demos followed by student reflection? Are there any non-essential activities that can be eliminated or replaced with less ideal, but also useful activities? For example, moving from a live performance to a filmed performance?
For more detailed advice on moving lab courses online, this recent guide by CFT Associate Director Cynthia Brame this Chronicle article by Heather R. Taft and this Inside Higher Ed article by John D. Loike and Marian Stoltz-Loike are great places to start.
Tips for Transitioning Online and Keeping your Sanity
In case of any kind of emergency that may keep you or your students from campus, it’s important to remember that the tools you need to teach online are already in place. For instructors moving course content online in a hurry, remember to:
1) Keep expectations realistic. Good online courses take a long time to build, but even given a week or two, we can create a useful, short-term experience for our students. Also, students may have unreliable access to technology when not on campus, which might require some flexibility from us as instructors. There will be some bumps in the road, but we’ll work through them together.
2) Capitalize on technologies you are already using plus one or two new ones. No one can learn AND effectively use six new tools today! Start by doing more of what you already do. If you need to use new technologies, give yourself plenty of time to read up and play around with the new tool.
3) Get help. Connect with colleagues who are faced with similar challenges or similar kinds of courses. If you have questions about any Brightspace tools, check out our on-demand resources or reach out for support by phone or email. For help with classroom-based technologies or filming on-campus class sessions, email VUIT at av.support@vanderbilt.edu.
NB: If you want an even more extensive description of what can be done in an online course, I highly recommend this Google Doc created by Jenae Cohn and Beth Seltzer at Stanford.
Leave a Response